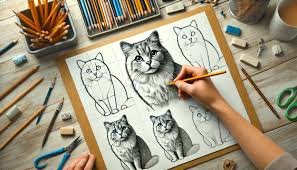
Drawing is a wonderful way to express creativity, and one of the most beloved subjects to draw is a cat. Cats are not only adorable but also full of personality, which makes them a fun challenge for artists of all skill levels. Whether you are a beginner or an experienced artist, learning how to draw a cat can enhance your drawing skills and give you a new appreciation for these fascinating creatures.
In this blog, we’ll walk you through a unique step-by-step guide to drawing a cat using the keyword “drawing:a4z_-ymtkr8= cat.” This guide will cover the essentials of sketching the body, face, fur, and fine details of a cat, while making sure that each step is easy to follow and understand. We’ll also provide tips on how to add personality to your cat drawing and make it truly stand out.
Understanding the Basics of Drawing a Cat
Before you dive into drawing a cat, it’s important to understand the basic structure of a cat’s body. Cats have flexible bodies, large eyes, and expressive faces, making them great subjects to study. When you’re just starting out, focus on getting the proportions right and building your confidence with the initial sketch. Remember, the keyword “drawing:a4z_-ymtkr8= cat” is all about focusing on creativity while sticking to an easy-to-follow framework.
Step 1: Sketch the Basic Shapes
Every drawing begins with simple shapes. Start by drawing a circle for the cat’s head, followed by a smaller oval underneath for the body. The key here is to lightly sketch, as these shapes will serve as the foundation for your final drawing.
Next, use lines to mark the positions of the cat’s legs and tail. You can use simple curved lines for the tail and straight lines for the legs. When drawing a cat, keep the keyword “drawing= cat” in mind as you build the structure from these basic shapes.
Step 2: Add Facial Features
Cats are known for their large, expressive eyes and triangular noses. Draw two large circles within the head shape for the eyes. Place them evenly apart to capture the symmetrical look of a cat’s face. Then, sketch a small triangle between the eyes for the nose.
Underneath the nose, draw a simple “W” shape for the mouth, connecting it to the bottom of the nose. Cats also have small whiskers, so add some short lines coming out from the sides of the face. At this stage, your drawing should start to resemble a cat. The keyword “drawing= cat” will guide you in ensuring that each step is smooth and understandable.
Step 3: Define the Body
Once you’ve completed the head, it’s time to move on to the cat’s body. Using the oval shape you sketched earlier, define the torso and legs. Cats have slender bodies, so use smooth lines to outline the shape of the body. Add curved lines to give the legs more dimension, and don’t forget to sketch out the paws.
Cats’ tails can be drawn in various positions—curled, straight, or slightly wavy. Choose whichever tail position you prefer, but keep it in proportion to the rest of the body.
Step 4: Add the Fur Details
Now that the basic structure is complete, it’s time to bring the cat to life by adding fur details. Use short, quick strokes to represent the fur, particularly around the neck, chest, and along the edges of the body. For a more realistic effect, vary the direction and length of the strokes.
Fur can also add depth and texture to your drawing, making it more interesting. Incorporating the keyword “drawing:a4z_-ymtkr8= cat” as you work through this section will ensure your drawing stands out with its unique charm.
Step 5: Shade and Add Personality

Shading is what transforms your simple sketch into a 3D masterpiece. Focus on adding shading around the eyes, under the chin, and along the body’s curves. This will give your cat drawing dimension and make it look more lifelike.
Every cat has its own personality, and you can reflect that in your drawing by adjusting facial expressions, the shape of the eyes, or the positioning of the ears. Whether your cat looks curious, sleepy, or playful is up to you.
Step 6: Final Touches
At this point, your cat drawing should be almost complete. Review your work and make any adjustments needed. Erase any unnecessary lines or refine the shading to add more depth. The final touches, like the positioning of whiskers or the shine in the eyes, can really bring your cat drawing to life.
This guide using “drawing:a4z_-ymtkr8= cat” should leave you with a beautiful drawing that you can be proud of. Whether you’re new to drawing or a seasoned artist, the steps provided here are designed to be simple, clear, and effective.
Cat Drawing Tips and Tricks
- Practice Makes Perfect: Don’t worry if your first attempt doesn’t turn out the way you want it to. Drawing takes practice, and the more you work on it, the better you’ll become. Practice drawing different types of cats, from sleek short-haired cats to fluffy long-haired ones.
- Use References: Study real cats or use reference photos when drawing. This will help you better understand the anatomy and posture of cats, and will also improve your drawing skills.
- Experiment with Different Styles: Once you’ve mastered the basics, try experimenting with different drawing styles. You can create a cartoon-style cat, a realistic cat, or even a stylized abstract version. The possibilities are endless!
- Have Fun with It: The most important thing when drawing is to have fun. Cats are full of personality, so let your creativity flow and enjoy the process. Whether you’re using the keyword “drawing= cat” or any other style, let your unique artistic voice shine through.
Conclusion
Drawing a cat can be a rewarding and enjoyable experience for anyone who loves to sketch. With this step-by-step guide, you’ll have all the tools you need to create a beautiful and unique drawing of a cat using the keyword “drawing:a4z_-ymtkr8= cat.” Remember, it’s all about starting with the basics, practicing, and letting your creativity flow.
Whether you’re drawing for fun or improving your skills, each cat drawing will reflect your artistic journey. Keep practicing, experimenting, and enjoying the process, and soon you’ll be creating stunning works of art that truly stand out.